December 13, 2021
—
Ecommerce
—
15 min read
Product Photography: The Ultimate Ecommerce Guide
Tips and tricks for efficient ecommerce product photography.


Ben Bitvinskas
Co-founder, Atlasmic

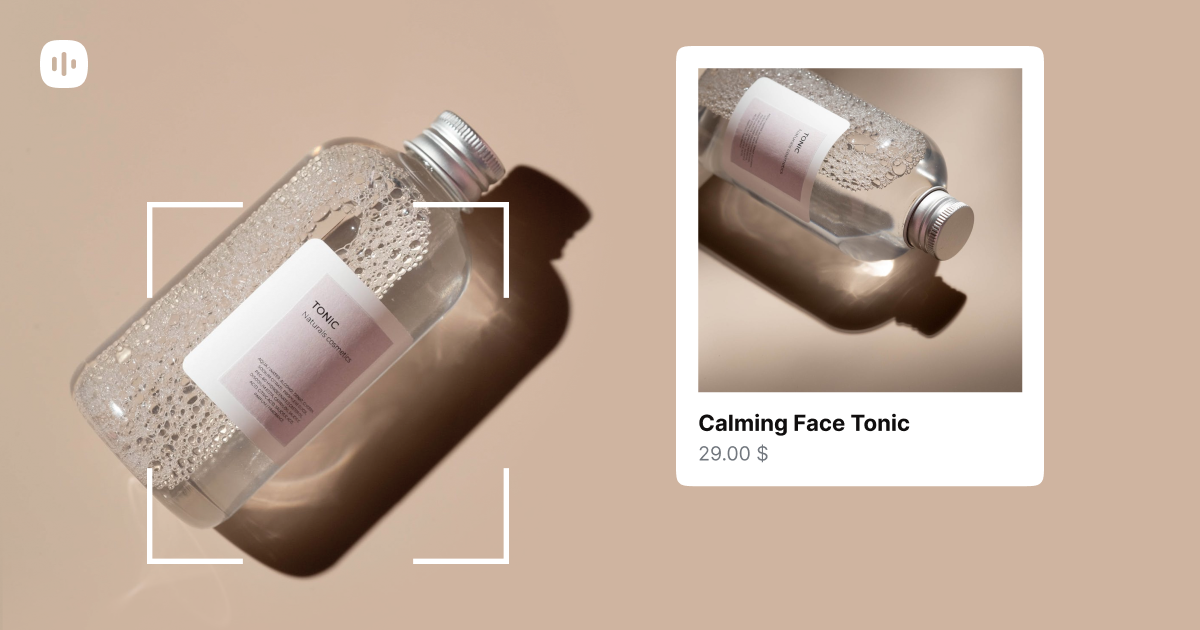
Stats and common sense should tell you straight away - good visuals and good product photos are the gateways to making more sales. If you want to sell, you have to take and post quality visuals of your products. But how can one take and produce high-quality photos for their online store? Well, you’re in luck, if you’re looking for the answer because, in this article, we will be focusing on tips, tricks, and techniques of
product photography
for e-commerce. So, let’s begin!First - try to understand what makes a great product photo?
Before you try and publish anything, either spend some time scouting the web, or prepare some mock-up shots and do a focus group test.
Each product and each brand is different, hence, there isn’t one single way to make right or great photos for your products. However, there are some general tips, tricks, and ideas which you can employ, in order to show off your goods from the best angles and accentuate the strengths without showing off the weaknesses.
If you haven’t got the time or desire to focus on
product photography
, you can just scout some local pros and have them do the job. However, if you’re just starting dropshipping or ecommerce, it’s much better to get maybe even a basic understanding to know these things. They might help you realize a vision or showcase the product from an angle that best represents your own brand and its ideas.

For example, have you noticed how the burgers in McDonald’s ad boards look significantly better than what you’re served? That’s not just clever lighting and careful attention to detail. Sometimes, to make food look good, the ad people don’t use real food at all. They might even replace meat or bread with plastic lookalikes to have a more aesthetically pleasing visual. There are also other tricks that advertisers use.


Yes, sometimes you have to really think outside of the box to make good photos which encourage sales. You have to try different things with your target audiences and see what kinds of pictures they will respond to, best.
How much should you spend on equipment?
Nowadays, having the newest iPhone or an Android phone with a good enough camera could do the trick. These new phones can produce photos with very high resolution which means that you can get away without needing to buy a dedicated camera.
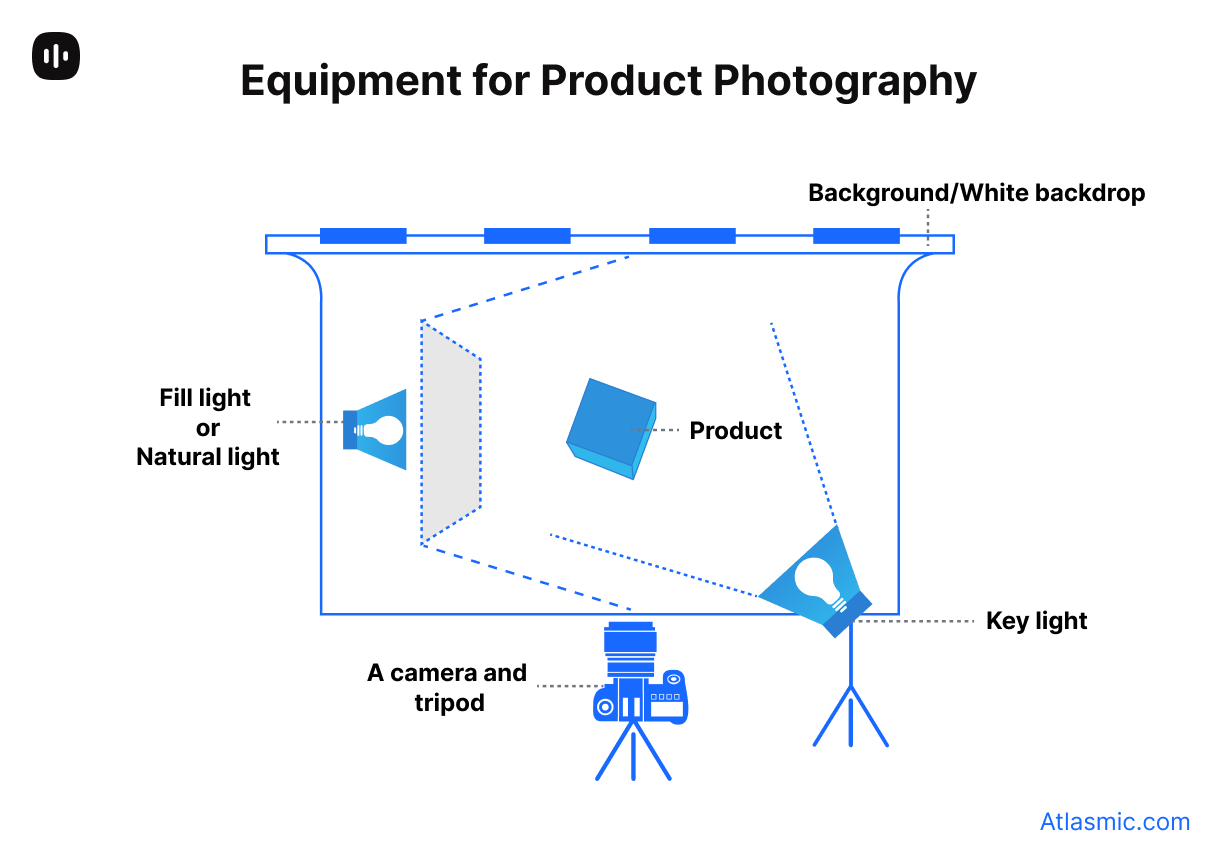
What you should get are the following:
- A tripod
- A white backdrop
- Some studio lights or take photos in a space with sufficient natural light
- A table
- Flashbulb or another form of bounce
- Access to a photo editing tool or software
Tripod for product photos
You only need a tripod that has an adjustable height and tilts angle. These can be bought for under $20 on Amazon. However, if you have a camera, it might need a special or unique tripod that can cost up to 5 or even 10 times as much, but if you snap pictures with your smartphone, 20-30 bucks should be enough.
A white backdrop (background)
If your products aren’t too big, a simple 5x7 foot (approx. 1.5x2.1m) backdrop should be enough. On Amazon, you can find them for under $15-20 as well.
Studio lights
These are more expensive and usually start from $45 per unit. You’re likely going to need 2 of them to illuminate your products evenly from two sides. Let’s say you get a slightly better option for $60 per unit and pick up two units.
The bounce is cheaper and goes for around $20-$30, so let’s say you’re going to spend $25.
The table
Now if you really want to save money, you can pick up a table from a yard sale or from a Craigslist ad for less than $50. The only important thing is for the table to be big enough and level, so you can set the scene.
Photo editing software
A lot of options are free but you can license Photoshop from Adobe at under $20 per month.
The total cost of good product photo equipment
So, to sum up, you’ll need to spend around $250 to get your in-house, beginner photo studio ready. You can, of course, rent a lot of this equipment, but the investment, compared to the potential benefit, is so small, and the freedom that you get with owning your own equipment is super big.
Setting up the composition
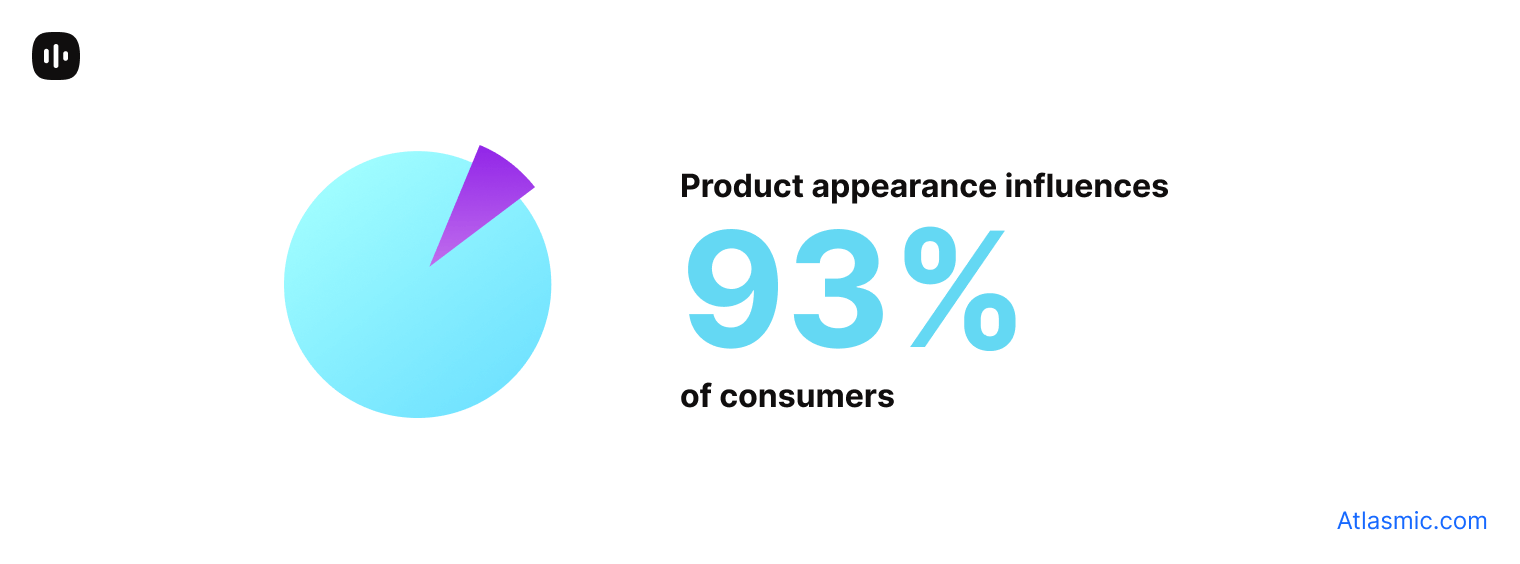
So, once you have the equipment ready, it’s time to move on to aligning the perfect shot. Remember, you’re spending time, money, and effort because it’s worth it. Stats show that 90+% of consumers consider the visual appearance of the product crucial in influencing their decision to buy.

Now that everything is set up, place the backdrop, level it out, clean it (if there’s dust) and align the shot so that the product is dead centre of your lens. You want the shooting area to be as fuss-free as possible. Of course, you can add in things for decoration like magazines for the background, colourful napkins, pop-art boxes, or other items that might enrich the composition. However, if your e-shop template and the whole design is minimalistic, you’ll never go wrong by keeping
product photography
clean and focusing solely on the product.
Set up the lights and try to avoid shadows that obstruct the view or are too visible. Take a few pics and instantly connect your photo camera or smartphone with a laptop or PC to see how those pictures come out on a larger screen.
Your table should be as close to the window as possible. You shouldn’t intersect the shadow from the windowsill for maximum clarity. The best compositions tend to be when the table is aligned to be at a 90-degree angle with the table. Keep in mind that only your studio and support lights should be on. If the main ceiling or other lights are visible, it can disrupt the entire aesthetic of the shot. Direct sunlight is bad either. You want natural light or adjustable studio lights.
If the window is behind the shot, the natural light can add a dramatic effect. This is great for tech items or something artsy.
Don’t forget to shoot multiple angles of your product so that the customer can browse and view different pics to get even more attracted to the product.
Lighting - one of (if not the) most important aspect
Good lighting can make a photo and poor lighting can break it. If you don’t believe it, think about the times when you go into the changing room of a clothing store. Your appearance in the mirror, especially up-close, can be unflattering, to say the least. However, once you’re taking a selfie, you can play around with the angles and other settings, to make yourself look as good as possible. That’s due to the alignment of the object (you) with regard to the source of light. And it’s super important in every picture.
Some technical knowledge and products are necessary, in order to produce quality shots of your products. But reaching a level that is sufficient for decent photos isn’t as difficult as you might think.
First off, have something that you can use to modify and dim/brighten/adjust the lights. Smart LED lights are a great solution but they’re expensive. Up-and-coming photographers can recommend umbrellas that can be expanded and dispersed on-demand and cost a lot less to own. Second of all, it’s advisable to have no less than two lights that will be placed off-camera. This means any two lights that aren’t connected to your camera (hence, flash doesn’t count).
Once again we have to mention the lights themselves. You can experiment with the angles, but yet another technique you can try is having two lights, set quite high, looking down on the shot from 45 degrees angles, in opposing corners. This way you reduce the length of the shadows. Also, adjust the light so that the backlight is slightly brighter than the front light.
Natural light vs artificial light


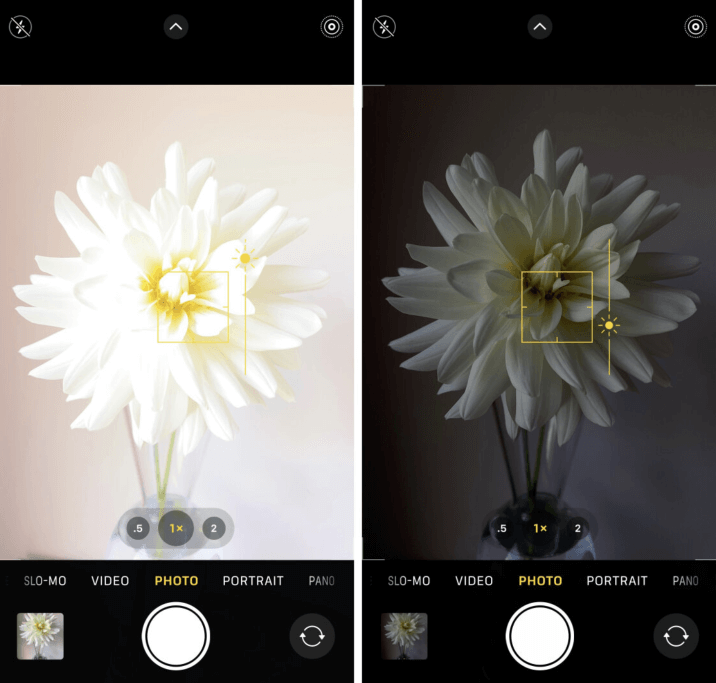
Here are two images of similar products. The left one uses natural light and the right one has artificial lights set up. As you can see, the left image is a bit more rugged, has a colder colour palette.
So, with this example in mind, there are usually two ways to go about lighting your product photo. Photographers insist on using only one form of lighting. If you mix the two together, you risk making the shot look off.
Natural light
. It’s what you get outside, from the sun. Actually, it is the sun, since it’s the only source of natural light that we can get on our planet. Sun produces a very soft light which is unique and very difficult to replicate, especially if you’re taking pictures outdoors.Natural light has its own limitations on
product photography
. You can’t increase the lighting intensity or change the look, you have to work with whatever you have. There are also time constrictions. If you’re working indoors, you have to align the shot so that the light shines from a particular angle and won’t disrupt the shot. Since the sun moves throughout the day, if you take multiple picture sets, you’ll have to adjust your shot over time.Product pictures should be done with natural lighting if you take them outdoors. Don’t try to add artificial lighting to an outdoor composition. This would just ruin it. If you also add a person to the shot (i.e. a model), try to mimic the natural light look or do it with a natural light altogether. Experts also suggest using natural light when you want to focus on the atmosphere just as much as on the centrepiece or if the product isn’t just a small piece (for example a large decoration, etc.).
Artificial light
. This is any form of light source that isn’t the sun. Your LED lamps, candles, fire, bulbs, and anything in between are artificial sources of light. The best thing about it is that you can do many adjustments and control the intensity, tone, and overall vibe of this form of lighting. Artificial lights are also called hard lights. That’s because as opposed to the soft natural sunlight, they provide a more focused lighting effect. Artificial lighting should be used in cases where you want to highlight something, express a certain mood or feel.Tips for camera settings
Whether you’re using a smartphone or a dedicated camera to snap product pictures, make sure that you are aware of the possible setting changes. These settings are present for a reason. Automatic and AI-based colour correction tools don’t always do the best job. If you want to have great product photos which boost sales, you need to provide manual input and adjust the settings for the best possible result.
Here’s how you do that and here’s the list of settings that you should mind the most.

Here’s how a simple change in a few settings can dramatically change the whole look of your photograph.
Flash
We recommend turning the flash off if you don’t have the appropriate lighting setup with the bounces set up. If so, also set the WB (White Balance) to automatic or default.
Quality and camera setting
It’s strongly suggested to take pictures in the highest possible quality. For iPhones and other smartphones that may be FULL HD, 4K, or even 8K resolution. For cameras - it’s the RAW setting or raw file capture which utilizes every single technical feature for the most detail. You can later downsize and downscale the picture whilst upscaling only makes the shortcomings of the photograph seem much more visible.
ISO & Exposure
The abbreviation ISO is used to define the sensitivity of the camera, towards your light source. You should set the ISO to its lowest possible setting (e.g. ISO 100, ISO 50, etc.). In general, the lower your ISO setting, the higher the photo quality is.
For the best exposure settings, experts have two suggestions - either use AV (Aperture priority), auto aperture or go manual.
If you choose aperture priority and your camera does have this feature, the f feature should be turned up to the max. It’s tricky to nail the shot with AV aperture priority because you might have to compensate for the increased exposure. So, avoid this if you don’t have any previous experience working with the camera.
Manual settings can also be a slight burden, but this is the mode to choose if your camera does not support aperture priority.
Auto exposure, however, will do the trick 99% of the time, especially if you’re a small and startup business that’s just trying out to take their first product photos. Exposure on your iPhone is automatically adjusted, based on the area which you click on. So it’s usually best to focus on the product and the camera will do the rest to make the perfect shot. Change the exposure point to get a different lighting.
Optical zoom
Don’t use digital zoom as it just increases the scale of the picture and loses quality. If you use optical zoom (your camera must support it), this is a great way to focus more on the product and less on the distracting surroundings near it. Wide-angle lenses can be labelled as an enemy for great product photos as they distort the whole field of view.
Now you’re good to go. Take the pictures and let’s move on to editing.
Photo editing (post-production) for product photos
So, you’ve taken the pictures and are happy with the results. Before publishing, you need to pass them through the vibe-check of post-production editing. This is done in programs like Photoshop. Of course, there are alternatives, but if you aren’t familiar with other, specific types of software, learning Adobe Photoshop is a great investment into your digital skillset, hence, focus on it.
Adobe Photoshop gives you an almost endless array of tools that can help you alter and impact the way your shots look.
Product photography
can become magical after some work with Photoshop.

Adobe Photoshop is by far the most popular choice of software for photo editing.
Keep in mind, this process takes time. If you want to save time, you can use AI-based tools or apps on your iPad or iPhone to retouch photos in bulk. This will provide an economy-level result but do it very quickly. However, if you want to maximize the visual aesthetic, go for Photoshop editing on a larger PC or laptop screen.
You need to have some understanding of visual aesthetics if you want to successfully edit product photos. You can compensate for a lack of experience with a grand vision in mind, but it’s usually best to just make the product look clean, eliminating any background noise and adjusting the colours according to your brand’s image.
Also, you can outsource photo retouching services from sites like Fiverr and Upwork for as low as $1 per picture for a beginner-level retouching or <$4 per picture for a medium to high-level adjustment. This will save you enormous chunks of time and you can utilize it elsewhere.
Product photo optimization for online publishing
If you’re happy with the retouching, your product photos are almost ready to get published. However, you should take care of the picture SEO first. A significant portion of your traffic and potential customers will come from Google, hence, you should make your pictures SEO-friendly, so Google ranks you better.
Proper image optimization is also related to the load speed of your website which is a key component to having a happy customer. Images that are too large can cause the web to load slow and drive customers away.
You need to find the silver lining between great quality and size optimization for load times. E-commerce gurus might suggest photos that are no more than 250KB per pic, but it’s up to the load speed.
Depending on the size of your HTML container, you might need to adjust the scale of your picture. Resizing it is easy in Photoshop or web editing tools, so you only need to know the container size. Compress the image from the raw file with dedicated tools. Try not to lose too much quality but to reduce the size as much as possible, for faster loading times.
Final thoughts
So, we hope this guide was helpful and provided some useful insights on ecommerce product photography. Keep in mind that you will have to spend some cash on equipment if you want professional-looking shots. Don’t mix lighting, adjust your shot well, set the right settings on your camera, and snap the pictures. Then, go into post-production and retouch your pics via Photoshop or have a professional do that for you. Once your pictures are retouched and finalized, you can resize them and compress them to reduce the size until it offers smooth and fast loading times. And that’s pretty much it on how you do product photography!
More for your business growth

August 30, 2023
—
Marketing
—
3 min read
Power of Humor in Conversational Marketing
Learn how a witty opening line can convert anonymous visitors into potential clients.
Vaida Bit
Marketing, Atlasmic
May 10, 2022
—
Marketing
—
5 min read
COB vs EOD: Key Differences and When to Use Them
Learn about two abbreviations that are often used in business.
Ben Bitvinskas
Co-founder, Atlasmic
Sales Acceleration Platform. Copyright © 2023 Atlasmic.com